Wednesday, April 27, 2011

Chicken Hoop House, Part Three (Finale!)


All done!  We remembered we had an older canvas tarp lying around so we used that under the new one to make up the needed length.  The chicks were more interested in their food than the new housing, but that's okay.  And no more cleaning up chicken poop!!!  Yay!!!!!!

We got a little bit of sunshine today after all the rain, rain, rain.  That was nice :)

31 Days to Clean

Will this work for me?  I've tried various books.. tried FlyLady but got too sidetracked with all the emails that program entailed... though it did work.. for a while.  I'd like to get (and keep!) my house clean.  Not show home clean, just lived in clean.

So the newest thing on the market is a new e-book called 31 Days to Clean.   In return for blogging about it today, I will get a free copy of the e-book, which will be great!  I like how Sarah Mae talks about getting to the heart of the problem, and cleaning our house to bless and love others.  I think I need to hear this!

It looks like she has a group challenge going for May... which just so happens to have 31 days!  May, here I come!!!

Monday, April 25, 2011

Chicken Hoop House, Part Two

DH got the rest of the parts we needed for the hoop house today, so work could go on!  DH is a highly motivated man when there's a job to be done.


The completed door with hinges and a really neat locking mechanism.  It's a simple lock, but DH has a hook attached to a chain to close it with.  No need for a key, and no lost lock!


Close up of the lock, just because I think my hubby is a genius!

The back tarp goes up.  Now this is not secured towards the top, because you want to be able to turn the top section down for airflow on hotter days.  We don't want to roast those birds just yet!

Side view.

 Covered with the canvas tarp.  When they say a canvas tarp is 10 x 16, they don't REALLY mean it's 10 x 16.  It probably WAS 10 x 16 before they did the hemming.  Hm.  So now we'll need to get two smaller tarps for the bottom two sides to put under the canvas tarp.  Actually that works out better, because this way the chickens won't be able to peck at the canvas tarp.

Part of the chicken hoop house team.. photo taken by the missing team member ;)  We called it done for the night, it was starting to rain again and the smell of chicken stew was starting to waft outdoors.

Almost there, stay tuned for Part Three!

Sunday, April 24, 2011

Chicken Hoop House, Part One


Today we started work on the chicken hoop house for the meat birds who are starting to escape their garage quarters.. not to mention stinking the place up!  I wanted something movable, but chicken tractors weren't quite was I was looking for.  So I found a plan online for a chicken hoop house and gave it to my hubby and told him that was what I would like.  He took the plans, made some adjustments and away we went!

Materials list is as follows:

(2) 8' x 50" cattle panels
(4) 10' pressure treated 2 x 4s
(1) roll chicken wire (ours is 4' x 50', we can always use the extra!)
(2) 8' regular 2 x 4s
(1) package plumber's strapping
(1) 16 x 10 canvas tarp for over the top
(1) 8 x 10 silver tarp for the back
Misc. scraps of wood, or additional regular 2 x 4s
Staples, screws, nails, wire, zip ties, etc.

The hoop house will be covered with a tarp over the top and the back, leaving the front open.  For summer we will also leave a gap at the top of the back part for cross ventilation.  Each day the hoop will be moved to a new section of pasture in our vegetable field.  That keeps the grass and the chickens happy!

First DH and oldest DS notched out the pressure treated 2 x 4s, each one about a foot in from the edge.  They should NOT be flush when you are done.  Also cut the front and back of the side pieces at a 45 degree angle, these will be your skids, and you will attach rope or chain to them for moving the hoop house.  Many plans said to leave a bigger gap on the front and back piece, this is to make moving it easier and also so if you run over a chick when you're moving the house it can roll out the back.  We're more concerned with predators, so ours is lower down.  We'll just move it more slowly.

Our plans said to add brace pieces over the top of each corner, but if we followed the plans, the bracing would have been awful since the pieces are not flush.

 So instead DH notched out the front and back pieces to fit the brace piece.  Beautifully done!

 Bottom frame complete.

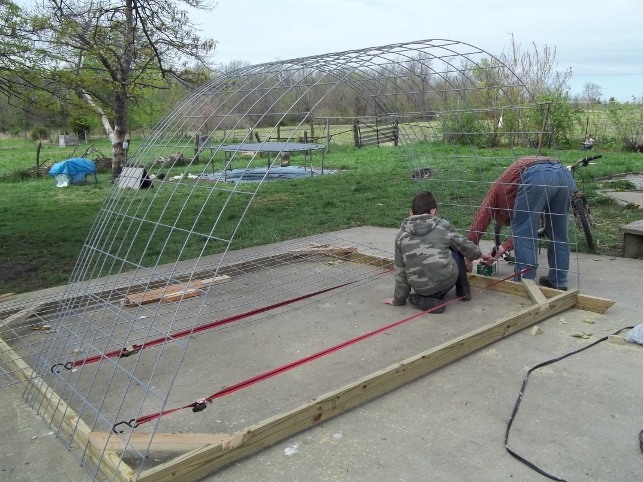
Now it's time to add one of the panels.  We first secured the panel with tie downs to keep their shape to make attaching easier.  We attached the hoops to the outside of the skids using fencing staples. 

 Second panel in place.

We secured the two panels to each other with some wire.  Notice the placement of the wire, this will prevent the wire from ripping at the tarp.

The back framing goes up.  This is done by making an upside down V and attaching that to the panel with plumber's strapping.  The 2 x 4 is also attached to the back of the bottom frame. Notice that we put the chicken wire on first before we added the back brace sections.  This makes it easier to pull the chicken wire taut.

 Framing for the door.  We made ours about 2' wide.  Again attached to the panel with plumber's strapping and screwed to the bottom of the frame.  After the door was on we added additional support between the door frame and the edge of the panel.

 Kids working on the chicken wire for the front section.  Our kids are an awesome help to us.

DH notching out the wood sections for the door.   I love those hands.

Almost complete!  We ran out of time and we don't yet have hinges or a lock.  Awesome work guys!  The chicks are going to love their new quarters :)  We retired for the night for a nice Resurrection Sunday dinner - roast lamb and potatoes, yum!

Saturday, April 23, 2011

Escape!


When you go to feed and water the chicks and find this... you know it's time to make other housing plans!

Green eggs.. and ham?

No, not really.  But my idea of putting a spot of green food coloring on each chicken that laid an egg often left the collected eggs somewhat green too, ha!

As an update on that - all 13 chickens are laying.  Some are just not laying often enough!  The Buff Orpingtons are the best layers, with the Barred Rocks coming in a close second, then the Rhodies and then straggling behind is our white mystery chicken (not a Leghorn.)

So I guess none of them will be sent to freezer camp.. and the more I think about it, the more I wonder if they are in fact not eating ENOUGH chicken feed.  When we had them cooped up more they laid more eggs, but they ate more feed.  Now they're free ranging much more and I wonder if that's put a dent in their production.  I guess it's a trade off... less feed, less eggs, - more feed, more eggs.

We have added Oyster Shell to their feed since we've been getting some interesting eggs.

Oh.. and as an aside... Barred Rock chickens are MEAN when they are sitting on an egg!

Friday, April 22, 2011

Of ducks and poop...

On Good Friday morning we decided to do a major cleaning of the mudroom.  With the ducks and kittens living in there it was getting a little hectic.  When everything was all nice and clean smelling and neatly re-packed I decided I didn't want the ducks back in there.  They are getting so big and they are MESSY and STINKY, even though they spend the majority of the day outdoors.

So when DH got home from work we went to work on building a temporary duck house in the dog run attached to the chicken coop.  We used hay bales, a section of a cattle panel for the roof support and a tarp.  It actually makes a pretty nice little shelter!

Ducks in the run
Duck shelter
Time for bed!
Nice and cozy :)
It's actually surprising warm in there.  Nice and protected and as long as we keep their water OUT of their shelter area it should stay relatively dry.

Once we have our big chicken coop built, the current chicken coop will become the duck house.  That's not too far off now, so this will do nicely until then.

Oh.. and the ducks are starting to QUACK!  Love it!


Wednesday, April 20, 2011

New Chick Housing

Remember when I mentioned our little Daredevil broke one of the chick containers?  I had to think up something really quick.  Luckily we had some panels from a shower we removed that the previous owners had started installing in the mudroom.  Not a great install so we took it out.  I joined two of the panels together in a circle and this became a pretty awesome home for 33 chicks in the garage.  We lost one of them when he got squished by his siblings, so we no longer have 34 :(


Their new digs, they love the extra space!

Tuesday, April 19, 2011

Monday, April 18, 2011

Green chickens and other weirdness


So I have decided that for the amount of chicken feed we go through (even with free ranging) that getting 6 to 8 eggs a day just isn't cutting it from 13 hens. So I'm on a mission. Every so often I went out there this morning to see who was in the nesting box. Now my kiddos can tell every chicken apart.. I can't.. so I've been putting a drop of green food coloring on each chicken who was sitting on a nest. And THAT is why I currently have six green tinged chickens.

Six green chickens.. six eggs in the carton.. that adds up... BUT!

Notice something funny? My kids thought this was hilarious! I have no idea why one chicken laid such a teeny tiny egg.

That's a regular size egg, and the tiny egg. Weird.

Anyway, I have been reminding the chickens about the "You don't lay, you don't stay" policy I first told them about when they joined us last year on the farm. They just look at me with that blank chicken stare though..

And now I better get off here so I can get outside and put the 8.5 lbs of Kennebec seed potatoes that I bought for the bargain price of 99c in the ground! The other potatoes are already sprouting beautifully. I also have to go supervise the tilling DH is about to do, we're getting ready to plant corn!

Saturday, April 16, 2011

The ducklings have been growing.. again!

This is where they sleep at night, in our mudroom. They sure do go through their food and water FAST!

In the morning we put them outside, which they love. Oldest DS cut off one side of a mouse chewed water container and turned it into a little mini pond which they love to swim around in. It is clean for about the first 5 seconds after getting filled. People are not exaggerating when they say ducks are dirty! We love them though, they hang out in a group in the backyard and go everywhere together.

Exploring their new world.


I added a little video of the ducklings for your viewing pleasure :)


Around the farm


Today we managed to get the electric wiring done in Pasture 2 so we could move the pigs into that pasture. It took us all day, first moving the shed, then finishing the barbed wire fencing in one area and then putting in the electric. But it's done! I am so glad DH built the pig shed on skids so we could move it from area to area. The Farmall got put to work today!

All we haven't done yet is put a pig water nipple on the waterer on that side, so we left the small gate between the two pastures open and will add the water nipple tomorrow.


This is the double sided waterer we were lucky enough to inherit with the house and land. If you look closely, you can see my wonderful DH has added a pig water nipple on the front and connected it to the waterworks. SO wonderful not to have to carry buckets of water around! The pigs love it too. We installed the green gate on the left last weekend, that is our human gate between the two pastures, we don't have the livestock gate in yet, so the animals use this too. Butterbelle was a bit hesitant, but has since adapted to it quite nicely. DH is going to add another water nipple on the other side of this waterer so the pigs will have water available in both pastures.

Exploring the wonderful green grass. I am pretty excited that our rotational grazing plan is coming along nicely. We still need to divide the third area in two and then we'll have four pastures total, with a possible fifth in our vegetable area.

Our little Daredevil. He has caused a bit of havoc on the farm in the last week! He was climbing on the haybales and knocked one onto the chicks container after I moved them into the garage. They haybale broke the container so I had to figure something else out for them. What we have now is actually better, I'll share a photo of that later. He also rode into one of our newly planted fruit trees today, luckily no damage, but he was grounded from the ATV for the rest of the afternoon.

The tree in question, as you can see it's just fine. Look at those buds! Other things are doing great on the farm as well....

The garlic.

The spinach, broccoli and cauliflower bed. They are doing wonderfully well. We had some really strong winds here the last few days, and a lot of the greenery you see is those "helicopter" seeds blown down from one of our trees.

The gooseberry bush we got from Henry Fields. I cut it down to half its height after we planted it. We've never had gooseberries before.. so we really hope they're good!

Grapes coming along nicely.

DH gave lessons to our oldest DD and oldest DS on how to drive the tractor. They both did great!


The chickens haven't quite been pulling their weight. We have 13 laying hens and only get about 8 eggs a day. They've definitely slowed in production, so we're looking at adding oyster shell to their feed again.

Today was a very busy, but productive and satisfying day!
Related Posts Plugin for WordPress, Blogger...